How to Repair Leaks from Faucets
Leaks from faucets can lead to damage to counters, cabinets, and walls. Water that reaches these areas may also be contaminated with mold.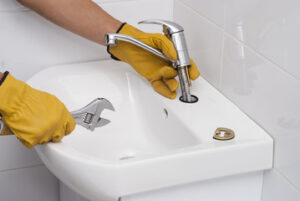
Fortunately, most of the time, leaks can be corrected by homeowners without calling a plumber. The first step is to remove the decorative cap from each handle. However, if you need some help from the experts, you can call St Pete Plumbing.
The most common cause of leaky faucets is a loose O-ring. These little rings are located around the stem and can become worn out from regular use or lose their seal completely. To fix this, simply replace the O-ring. Leaks beneath the handle can also be caused by a corroded valve seat, and a damaged cartridge may not be able to close the valve properly. These problems are typically easy to fix, and a skilled do-it-yourselfer can accomplish the repair without requiring professional help.
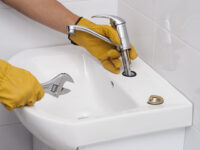
First, turn off the water. It is very dangerous to work on a leaky faucet with the water still running, and it will eventually spray over the bathroom floor and into your cabinets and walls. If you cannot locate the shut-off valve or are unsure how to do this, call a plumber immediately.
Next, duct tape the jaws of your slip-joint pliers to protect them from the sharp edges of the faucet parts, and remove the decorative cap at the top of the handle. Using the spanner tool that came in your repair kit, unscrew the handle screw and pull or pry it off. If it is stuck, try wiggling and twisting while you apply gentle pressure. Do not bang the handle free, as this could break the internal components.
Leaks around the base of the spout are often caused by a corroded valve stem seat, which connects the compression mechanism to the valve or cartridge. In older valve seats, this part was usually made of brass and could be resurfaced to repair the leak, but the newer plastic ones cannot be resurfaced and need to be replaced.
A leaking spout may also be caused by a worn-out disk cylinder or neoprene seals, which are very easy to replace. These are generally inexpensive and can be found at most hardware stores. Be sure to buy exact replacements to ensure proper fit and function. Occasionally, the seals can be damaged by mineral deposits and need to be soaked in calcium remover or white vinegar before being replaced.
Valve Seat
While it’s possible to fix leaks in most faucets by replacing washers, neoprene seals, and O-rings and by installing new cartridges or stem assemblies, sometimes the cause of the leak is much more serious. Specifically, sometimes the valve seat is worn or eroded and does not form a watertight seal with its partner component when the stem is pressed into place. Fortunately, most metal valve seats are replaceable and can be unscrewed from the faucet body and replaced with a new one. Those that cannot be replaced can often be “dressed” or refaced using a special tool called a seat dressing or refacing tool that is sold at most hardware and plumbing supply outlets.
To do this, first shut off the water supply to the faucet by closing the valve under the sink or at the main line next to the meter. Remove the handle from the faucet, and loosen and remove the packing nut or bonnet that holds the stem in place (it may help to turn the handle counterclockwise to help release it).
Insert the seat dressing tool into the square or hex-shaped hole at the bottom of the faucet body. Fit the handle end of the tool into the hole at the base of the valve seat and begin to turn it clockwise, working slowly and firmly. After about 10 turns, you should be able to feel the tool begin to cut into the seat. Continue turning and feeling until you are able to pull the tool out and clean off any metal filings or chips that it has left behind.
If you find that the seat is still not cutting very well, try spraying some lubricant onto it (a light misting of penetrating oil works well) and tapping it with a screwdriver with a hammer to work the tool into the valve seat hole more deeply. Repeat as needed to reface the valve seat.
After the valve seat is dressed or refaced, install a new cartridge assembly and reassemble the faucet, tightening the packing nut or bonnet with your hands to ensure it is secure. If your faucet is old enough, it will likely require a new disk cylinder assembly that has neoprene seals in place of the original rubber ones.
Cartridge
Cartridge faucets have a handle that rotates to open and close the valve. They come in one-handled and two-handled varieties. When the cartridge is leaking or not working properly, you can replace it easily with a kit from a home improvement store or plumbing supply center. Before you begin, shut off the water to the fixture at the main valve and remove the handle, escutcheon (the flat plate that surrounds the handle), and chrome sleeve (if applicable). Make sure you know whether your faucet is single- or double-handled because the process is different for each. You may also find an O-ring and a spring inside the faucet housing, which you should also replace as needed.
The cartridge is held in place by a screw or retaining clip that is visible when you remove the handle. The screw may be an exposed Allen head set screw on the side of the handle, or it could be an uncovered bonnet nut on the top of the handle body. To remove the handle, unscrew or pry off the decorative cap at the base of the handle, then use a screwdriver to remove the handle screw. If there is a retaining clip, use pliers to grab it and pull. Once the retainer is removed, the cartridge should slide out of the faucet body. If the cartridge has a brass screw on top, note its orientation so you can reinstall it in the same way.
Many older cartridges have tabs that fit into notches on the faucet body. Newer styles typically have a nut or screw that holds the cartridge in place. The screw or nut is usually located behind the handle, but it can be hard to access. You can use a screwdriver to remove it, or you can buy a cartridge-pulling wrench designed for your specific brand of faucet.
Some cartridges are easy to lift up and out of the faucet, but others are stuck in place by minerals in your water. The kit that came with your new faucet may include a plastic tool with notches on it to loosen the cartridge. If yours isn’t, you can try using a nail file to create notches in the plastic. Then, slide the tool onto the cartridge stem and line up the notches on the cartridge with those in the tool to loosen it.
Ball
Dripping faucets are more than just an annoyance; they waste water that could cause damage to your countertop or other surfaces. If left unattended, a leaking faucet can quickly lead to expensive water damage and potentially require countertop replacement.
Fortunately, a qualified plumber can fix most issues with your faucets. They can diagnose problems and determine if repairs are possible or if a new faucet might be more cost-effective.
The first step in any faucet repair project is to shut off the water supply by twisting the valves under your sink. You may also want to close the drain, just in case some small tools drop into the sink.
Once the water is turned off, remove the faucet handle and pry off the decorative cover to expose the Allen screw that holds it in place. Using a screwdriver, tighten the screw counterclockwise to lift the handle off.
If your leaking faucet is a cartridge or ceramic-disk faucet, you can reinstall cleaned neoprene seals in the base of the ceramic-disk cylinder or install new ones. You can find replacement neoprene seals online or at most hardware stores, but it’s important to know the exact size of your ceramic-disk faucet to ensure you’re buying the right size.
You can purchase replacement cartridges for Moen “cartridge type” faucets at most hardware and home centers, or you can buy a complete cartridge repair kit from a plumbing supply store. Before installing the new cartridge, you’ll need to reinstall the rubber seats and springs and the stainless-steel ball. If the old ball is visibly worn, replace it with a new one.